The bad news is that it’s not possible to simply flash your stock ROM with the Camera2 API – you’d have to rebuild the ROM and add Camera2 API support yourself, or flash a custom ROM with the API built in. The good news is that there are a few tricks to enable Camera2 API if it was left in your ROM but disabled by the manufacturer. There’s also a native way to take RAW format photographs with Mediatek devices. I will show you these tricks below.
What the Heck is RAW Format and Why do I want Camera2 API?
If you’ve stumbled upon this guide and have no idea what RAW format is, it’s basically a lossless image format – think of it like video or music bitrates. You know the difference between 120kbps, 320kbps, and FLAC music files, right? Or watching Youtube videos in 320p vs 1080p? It’s basically the same thing for JPEG vs RAW, sort of. RAW format will capture photos in completely lossless glory, meaning zero image compression (but much larger file sizes). These RAW images are much better for manipulating in image software – because just like the filetype name implies, they are completely RAW image data. If you compare a JPEG to a straight out of camera RAW photo side-by-side, the JPEG may appear to have brighter colors or other visual enhancements – this is because JPEGs are post-processed by the camera software and built into the image data.
Thus, an un-edited RAW may appear uglier than a JPEG in side-by-side comparison. But for image manipulation enthusiasts, the lack of “post-processing” by camera software is exactly what you need. The post-processing is entirely in your control. This means that RAW photos can be enhanced to a much greater degree than JPEG files, because you’re not fighting against the camera software’s post-processing “magic” applied to JPEG files.
Enable Camera2 API in Build.Prop
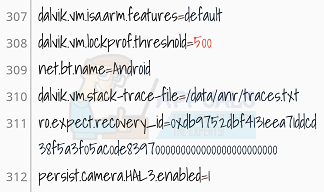
Warning: Always create a backup of your build.prop in case something goes wrong. This method has a 50/50 chance of success, but it’s worth a try. It seems that some manufacturers have Camera2 API built into the ROMs, but disabled it for some reason – by simply adding a line to the build.prop in the /system partition of your Android device, you can enable the Camera2 API functionality. See also: How to Edit the Android Build.Prop with Essential Tweaks First you’ll need a rooted phone, and a method of editing your build.prop file. You can either use a root file explorer app (like ES Explorer) to navigate to the /system partition on your phone and open build.prop with a text editor, or you can use a dedicated build.prop editor like JRummy BuildProp Editor.
Once you’re inside the build.prop, search for this string: Change the 0 to a 1, save and exit the build.prop, then reboot your phone. If that string it not found in your build.prop, try manually adding persist.camera.HAL3.enabled=1 to the bottom of your build.prop file, save and reboot. You can then test if it worked by launching a third-party camera app like Open Camera or Camera FV-5 and checking in the Settings menu if you can enable Camera2 API mode.
Enable Camera2 API in Terminal Emulator
An alternative method to the above is to try and enable Camera2 API through Terminal Emulator. Simply launch the terminal and type the following commands: Reboot your phone and check if it worked with a third-party camera app like Open Camera or Camera FV-5.
Shoot RAW Photos in Mediatek Engineer Mode
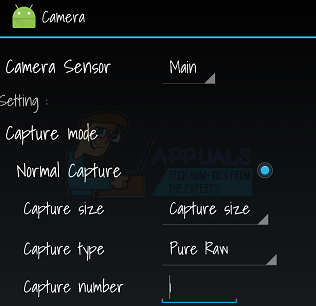
If you have a Mediatek-chipset device, there is a way you can shoot RAW photos even without Camera2 API enabled, via the Engineer Mode. There are a handful of methods to access Engineer Mode: Open your phone dialer and type this number: ##3646633## Alternatively, you can install an app like MTK Engineering Mode to always have a shortcut icon on your home. You can also install Xposed and the GravityBox module (see: How to Completely Theme Android with Xposed Modules), which will also have a launcher into Engineer Mode.
In any case, once you’re inside Engineer Mode, simply scroll right to Hardware Testing > Camera. This is a testing mode for the camera hardware, but you can enable all kinds of camera options, including RAW format, and take photographs. When you shoot RAW photos in Engineer Mode, two files will be saved to /DCIM/CameraEM/ directory – A JPEG for previewing the photo, and the actual RAW file, which cannot be previewed on the Android phone. You will need to export the RAW file to your PC and use image-editing software like Adobe Photoshop to manipulate the RAW image, and you may also need to convert it to a universal RAW format rather than what your phone outputs.
How to Enable Persistent Camera2 API on Xiaomi Mi A2 Across RebootsFix: CHKDSK is not Available for RAW DrivesHow to Fix Raw-Mode is Unavailable Courtesy of Hyper-V?Google’s Tensor SoC on Par with Snapdragon 865+ in Raw Performance?


